As an Amazon Associate, we earn from qualifying purchases. Some links on this site are affiliate links at no extra cost to you. Our recommendations are based on thorough research and editorial judgment.
7 Best Roof Mounted Solar Pool Heater
Choose from the IRONMAX Solar Pool Heater, a 2.5×10 ft roof unit, or the DIY Solar Pool Heater Kit with a 15-20 year life, for sunny climates. Compare the Universal Solar Panel 4×12′ and the Goplus 2.5×10′ dual panels, plus SunHeater 2×20’ arrays and the S120U universal 2×20 setup. Include Smartpool SK43 mounting hardware or rack kits, verify 0.75 HP pump compatibility, 21 PSI max, and sealant specs. Continue onward to learn further installation steps.
Key Takeaways
- Compare roof-mounted options like IRONMAX, Goplus, SunHeater, DIY kits, and Universal panels for broad compatibility.
- Assess heating gains: typical boosts of 6–10°F, up to 10.8°F under ideal sun.
- Verify roof compatibility, mounting rails, wind resistance, seals, and hardware provided.
- Confirm pump compatibility (min 0.75 HP) and max 21 PSI for proper flow.
- Choose durable, UV-stabilized designs with wide temperature ranges and routine maintenance requirements.
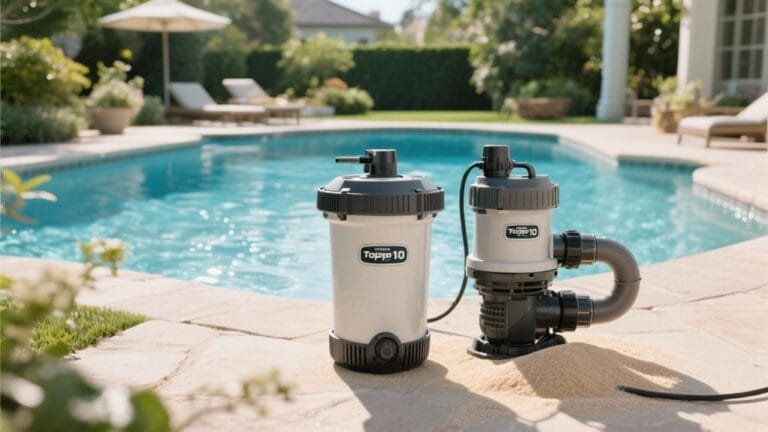
IRONMAX Solar Pool Heater 2.5x10ft In/Above-Ground

IRONMAX 2.5 x 10 Feet Solar Pool Heater for Above-Ground & Inground Pools
- Energy Efficiency and Warmth Enhancement: Achieve optimal pool warmth with our solar panel heater featuring a tube grid design for maximum sunlight absorption. Our...
- Durable All-Weather PE Materials: Our solar pool heater, crafted from lasting PE material, can endure temperatures from -20°C (-1℉) to 90°C (194℉) and withstand...
- Hassle-Free Setup: Connect our pool heater to your above-ground pool easily by securely attaching the pool water heater to the tube and connecting your pool pump with the...
You may be interested

Choose this 2.5×10 ft IRONMAX model if you need a roof-mounted heater for in-ground or above-ground pools. Attach the portable solar panel to your roof, align with sun exposure, and secure it with the included hardware. Verify your system meets a minimum pump power of 0.75HP and keep pressure under 21 PSI, then connect to hose clamps, adapters, and elbow connectors as instructed. The unit heats up to 3,408 gallons, raising temperature by up to 10.8°F, with durable PE construction surviving -20°C to 90°C. Clean regularly and monitor sunlight absorption for peak efficiency. Operate safely with basic maintenance procedures.
DIY Solar Pool Heater Kit 15-20 Year Life
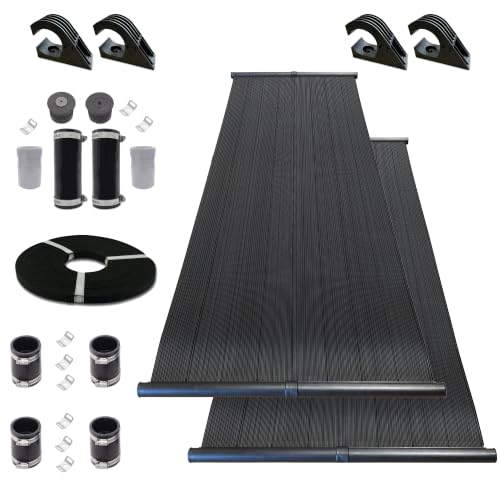
Highest Performing Design - DIY Solar Pool Heater Kit - 15-20 Year Life Expectancy (2-4x10 / 2" I.D...
- HIGH-HEAT PERFORMANCE - SwimEasy solar pool heaters capture more heat from the sun with superior absorber technology. They also enable water to move effectively through...
- SUPERIOR HEAT TRANSFER – SwimEasy’s manifold is molded directly around the absorber tubes, eliminating flow barriers and allowing water to freely exit the manifold...
- EXTREME DURABILITY - SwimEasy solar pool heaters are manufactured in the US with high-grade materials and specialized U.V. stabilizers. SwimEasy solar pool heaters are...
Check the 15-20 year life expectancy to gauge long-term value for rooftop installs on sunny climates. Assess components, including SwimEasy DIY Solar Pool Heater Kit, absorber panels, and over-molded header, for fit with your roof layout.
Measure roof area, confirm mounting rails, and plan panel orientation for ideal sun exposure. Connect to your pump and filtration, install wiring with weatherproof seals, and secure all fasteners per the included manual. Run water flow, check for leaks at over-molded header, and tune flow rate to maximize absorber efficiency. If performance drops, recheck seals, inspect alignment, and verify UV stabilizers remain intact.
Universal Solar Pool Heater Panel Replacement (4×12′)

Highest Performing Design - Universal Solar Pool Heater Panel Replacement - 15-20 Year Life...
- HIGHEST PERFORMING DESIGN - SwimEasy solar panels are among the highest performing panels on the market! The perfect option for anyone wanting both high heating...
- UNIVERSAL COMPATIBILITY - Replaces any solar pool heater panel that attaches with rubber hoses & hose clamps and has a round 2.0” I.D. (inner diameter) header manifold.
- BETTER ABSORBER - SwimEasy's absorber was created for its combination of performance and durability. Its specialized design takes the best of loose-tube and flat plate...
Identify this panel as the best roof-mounted option for universal compatibility with most solar pool heaters. Measure 4 by 12 feet and confirm a 2″ I.D. header, matching standard pool plumbing. This unit features SwimEasy absorber technology, combining loose-tube and flat plate designs for efficient heat capture. Expect an increased flow design, letting water exit the header freely into individual tubes to boost transfer. Durability comes from U.S.-made materials with UV stabilizers and a flexible zip-joint every 6 inches. Universal compatibility means rubber hoses and hose clamps on a 2.0” I.D. header manifold fit without modification. Check system results.
Goplus Solar Pool Heater 2.5ft x 10ft

Goplus 2.5FT x 10FT/ 20FT Solar Pool Heater for Above Ground Pool Inground Pools, Swimming Pool...
- ☀️【High-Efficiency Heating】 The 2 pieces of solar collector panels in the package can be connected together, with the total 10’ length and 2.5’ width. And the...
- ☀️【All-Weather PE Material】 The solar pool heater is made of built-to-last PE which can still work well in the lowest -20°C (-1℉)and highest 90°C...
- ☀️【Energy Efficient Solar Panel】 With no electricity or gas connection needed, our pool heater absorbs and magnifies the solar rays within its streamlined housing...
This model suits above-ground and inground pools, thanks to its 2.5 ft by 10 ft dual-panel setup. Unpack the Goplus unit, inspect two panels, and verify total length is 10 feet and width 2.5 feet. Position it for rooftop or ground mounting, connect hoses with end caps, clamps, and adapters. Attach the included kit, guarantee pump rating at least 0.75HP, pressure under 21 PSI. The system heats up to 3,408 gallons, raising water temperature by about 10.8°F. Operate between -20°C and 90°C, leveraging solar design for rapid heat capture. Roll up, store safely, and monitor performance with simple checks.
SunHeater Solar Pool Heater 2×20 Panels
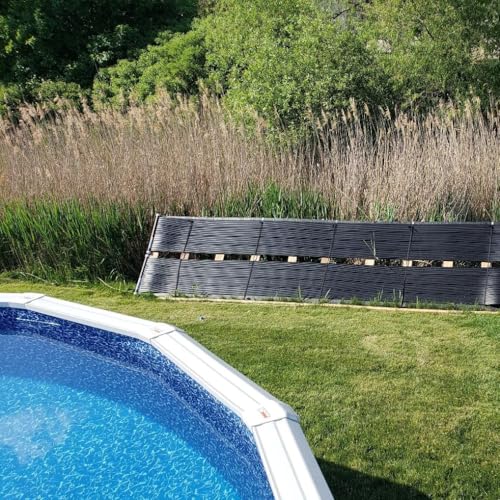
SunHeater Pool Heating System Two 2’ x 20’ Panels – Solar Heater for Inground and Aboveground...
- HEAT YOUR POOL FOR FREE – The SunHeater Solar Pool Heating System uses your existing pool pump to circulate water through specialized solar panels, where it is warmed...
- DESIGNED FOR ABOVE GROUND POOLS – Kit includes two (2) 2-ft x 20-ft SunHeater solar panels; for pools up to 24-ft round or 12-ft x 24-ft oval/rectangle.
- EXTEND YOUR POOL SEASON – Raise your pool water temperature up to 10 degrees F and enjoy a longer, more comfortable swim season!
If you need an efficient roof-mounted heater for mid-sized pools, the SunHeater 2×20 panels fit the bill.
Install the two 2-ft by 20-ft panels atop your roof and connect to your existing pump.
Use universal adaptors for 1-1/4” or 1-1/2” cuffed hoses, then route water through the solar array.
Expect a 6- to 10-degree Fahrenheit rise, extending swim-season comfort with simple DIY setup.
The system supports inground and aboveground pools up to 24-ft round or 12-ft x 24-ft oval/rectangle.
If leakage or poor circulation appears, verify hose connections, confirm pump compatibility, and consider extra mounting kits.
Maintain the system weekly.
SunHeater S120U Universal Sun Heater, 2 Feet by 20-Feet

SunHeater S120U Universal Sun Heater, 2 Feet by 20-Feet
- Simple DIY installation; for in ground or above ground pools
- Installs on roof, rack, ground or fence
- Patented web design for maximum exposure to sun's rays
Mount the SunHeater S120U on your roof for a streamlined, roof-mounted solar option. This universal 2-feet-by-20-feet panel connects to your existing pool pump and plumbing today. Position it on a rack, roof, ground, or fence, then secure with hardware. Uncoil the patent web design, align with sun path, and connect hoses to inflow and return. Run checks for leaks, verify flow, and make sure your pump operates without air pockets. Expect a 6–10 degree Fahrenheit temperature rise under ideal sun, with adjustments for climate. If mounting on the roof, maintain clearance, waterproof seals, and inspect periodically for wear and reliability.
Smartpool SK43 Roof/Rack Mounting Replacement Kit for SunHeater Pools,Black

Smartpool SK43 Roof/Rack Mounting Replacement Kit for SunHeater Pools,Black
- Roof/rack mounting replacement kit
- Fits Sun Heater pool models
- It safely mounts solar collectors to a roof, rack or fence
Choose the Smartpool SK43 when you need a robust replacement kit for SunHeater roof installations.
Secure solar collectors to a roof, rack, or fence, following safety guidelines.
The kit includes five six-foot black straps and fifteen stainless brackets.
Use straps to anchor brackets with Sun Heater fittings during installation.
Attach brackets to the roof rack, and secure all joints.
Inspect connections, check each tightness, then test overall stability before use.
If issues arise, verify compatibility and recheck strap tension carefully.
Keep the multilingual manual handy during installation and adjustments.
Document steps, confirm compatibility, store spare brackets for future service.
Factors to Consider When Choosing a Roof-M Mounted Solar Pool Heater
Begin by verifying roof mounting compatibility—measure rafter spacing, roof pitch, and rail system fit with your panel model. Assess panel efficiency on the roof by evaluating sun exposure, tilt angle, shading risk, and collector flow ratings for best performance. Plan for weather durability standards and installation ease, confirm stamped hardware, corrosion ratings, pump compatibility, and run tests with a 10 psi pressure check.
Roof Mounting Compatibility
Start by confirming your roof type and available mounting space, noting slope, rafters, and edge clearances. Verify the mounting system is compatible with flat, sloped, or ground racks, and check that brackets, straps, and connectors are included for secure attachment. Assess the weight and dimensions of the solar panels to guarantee your structure can support them without compromising integrity. Read the installation guidelines to determine whether extra kits or plumbing are required for your roof type. Review the manufacturer’s wind-load recommendations and local weather conditions to verify the system withstands navigable loads and gusts. Plan cable routing and sealant choices ahead, and verify compatibility with existing flashing, underlayment, and condensation risks. Document measurements, secure fasteners, and schedule a professional inspection after installation for safety.
Panel Efficiency on Roof
Assess your roof orientation and space, noting sun exposure hours and panel alignment to guide selection.
Evaluate absorber technology and heat transfer design, because these features directly boost thermal capture on the rooftop.
Choose high-performance panels with over-molded headers and enhanced flow, improving water circulation and energy use.
Position panels to face south in northern climates or ideal azimuth per site data, refining efficiency.
Consider operating temperature range, typically -20°C to 90°C, ensuring materials remain stable under sun heat and cold drafts.
Inspect absorber materials, select UV-stabilized plastics or polymers, and verify heat exchanger compatibility with your pool pump.
Document panel dimensions, for example 2 x 8 ft modules or 4 x 10 ft sheets, and plan clearance.
If performance dips, check flow rates with a 2- to 3-gpm per panel and reseat shrouds.
Weather Durability Standards
Match your roof-mounted heater to harsh weather by selecting UV-stabilized plastics and robust mounting hardware. Choose materials rated for -20°C to 90°C operation and extended exposure. Use UV-stabilized polypropylene or polyethylene bodies, designed with flexible zip-joints and over-molded headers for durability. Verify pressure tolerance up to 21 PSI and confirm leak resistance. Ascertain mounting hardware resists wind loads; secure rafters, use corrosion-resistant fasteners, and sealant where needed. Inspect for environmental stress features, like reinforced headers and compliant pressure ratings; plan for seasonal expansions and contractions. Schedule regular maintenance checks; clean surfaces and inspect seals yearly. Document results, track temperatures, wind incidents, and cleaning intervals to confirm long-term weather durability. Record testing results in a maintenance log, noting date, ambient conditions, and observed wear patterns.
Installation and Mounting Ease
Consult the manufacturer’s installation manual to verify included mounting hardware and DIY-readiness. Choose models that ship with a detailed installation manual, universal adapters, and mounting brackets compatible with roof mounts, racks, or fences. Confirm a minimum of 0.75 HP pump compatibility to guarantee adequate flow through the heater, and verify wiring and switch accessibility for safe operation. Favor roof-mountable units with tight tolerances and reduced manufacturing variance for easier alignment of panels and hardware. Follow included templates, pre-drilled holes, and weatherproof sealant recommendations to prevent leaks. Plan wiring routes, conduit protection, and strain relief, using compatible plumbing adapters to connect to existing hoses. Prepare for seasonal adjustments and maintenance checks during mounting. Document torque specs, fastener types, and sealant cure times for records later.
System Integration With Pump
Start by confirming your roof-mounted heater supports at least 0.75 HP and a maximum 21 PSI. Verify pump compatibility with a 0.75 HP minimum and ascertain the system operates below 21 PSI to prevent flow restrictions. Align the pump’s flow rate with the solar unit’s specifications, making certain the circulation rate matches design values for peak heat transfer. Inspect mounting and connection accessories included with the kit, such as hose clamps and quick-connects, and confirm they fit your plumbing layout. Plan for efficient integration by routing supply and return lines cleanly, minimizing bends and air traps. Test the system with a cold start, check for leaks, and monitor pressure and flow after initial operation. Document readings, log maintenance, and schedule seasonal checks for reliability year-round.
Frequently Asked Questions
How Do Roof Angle and Sun Exposure Affect Efficiency?
Symbolically, the sun is a compass; align your steps with its path to maximize efficiency. You measure roof angle and exposure precisely, pitch solar collectors at latitude minus 5 to 15 degrees, adjust with adjustable racking. Use 4×8 panels, 2-inch headers, and a flow rate of 25-35 gpm through 1.5-inch PVC, check manifold pressure, install bypass valve. Verify shading, clean panels, troubleshoot leaks, inspect seals, test differential temperatures with reading.
Can Roof-Mounted Heaters Work With Any Pool Size?
Yes, roof-mounted solar heaters can serve many pool sizes, but sizing matters. Determine system flow rate, target temp rise, and panel area; install an 8–12 ft x 16–24 ft array for 15,000–30,000 pools, or scale up to 24–36 ft by 6–8 ft for larger volumes. Use a variable-speed pump, DP heater, unions, bypass valve, check valves; verify roof load, plumbing, and freeze protection. Troubleshoot leaks, air, and poor circulation, adjust.
What Maintenance Is Needed for Roof-Mounted Systems?
Perform regular inspections for roof-mounted solar pool heaters to maintain efficiency and safety.
Check panel cleaning weekly, remove debris within 2 feet of gutters, and rinse with soapy water.
Inspect seals, gaskets, and unions monthly; replace damaged O-rings with 3/4 inch metric replacements.
Monitor loop pressures with a rated gauge, keep differential under 15 psi during operation.
Record inlet/outlet temperatures, verify flow rate around 25-40 gpm, calibrate as needed, periodically.
Do They Require Professional Installation or Can DIY Work?
Start with this stat: roof-mounted solar pool heaters slash energy bills by up to 30% annually. DIY is possible, but permits, ladder safety, and precise gluing, soldering, and pressure testing are mandatory. Plan the layout, mount rails level, and align collector angles to local sun exposure. Install a 2-inch CPVC or PEX feed, include a backflow preventer, purge station, pump, and pressure gauge; leak-test at 15 psi for 10 minutes.
How Does Wind Load Impact Performance and Mounting Safety?
Assess wind load at your site and plan mounting accordingly. Calculate uplift forces using ASCE 7 charts; multiply by your roof attachment area to size anchors. Install rated rails, clamps, and through-bolts; choose stainless fasteners with proper corrosion resistance. Tighten anchors to manufacturer torque specs, verify zero deflection, and perform wind tunnel or on-slab tests. Document setback limits, recheck after storms, and adjust tilt or retreat to maintain safety today.