As an Amazon Associate, we earn from qualifying purchases. Some links on this site are affiliate links at no extra cost to you. Our recommendations are based on thorough research and editorial judgment.
The 5 Best Pool Heater Bypass Kits for Effortless Pool Maintenance
Check compatibility before choosing a bypass kit for your pool heater. Consider the 77707-0001 Manifold Bypass Valve** or the Swimables Bypass Valve Kit for Pentair models, guaranteeing proper fitting. The Sun2Solar XD1 suits above and in-ground pools, while the Swimables Manifold Kit is ideal for efficient filtration. For Raypak heaters**, use the specified bypass kit. Always inspect materials, follow installation instructions, and maintain the system regularly to achieve peak performance. Want to explore more options?
Key Takeaways
- Ensure compatibility with your pool heater by checking specifications before purchasing a bypass kit to avoid inefficiencies.
- Choose high-quality, corrosion-resistant materials for durability and effective temperature regulation in your pool heater system.
- Carefully follow installation instructions and necessary precautions, such as draining the heater and shutting off power, for successful integration.
- Opt for energy-efficient bypass valve designs to enhance performance and potentially lower heating costs over time.
- Perform regular maintenance checks to catch leaks or clogs early, ensuring optimal system performance and longevity.
77707-0001 Manifold Bypass Valve for Pentair Pool Heater
Dfnidy 77707-0001 Manifold Bypass Valve Replacement for Pentair Pool Heater
- Heater Bypass Valv:Bypass valve kit for Mastertemp pool heater, also compatible with Sta-Rite Max-E-Therm pool and spa heater...
- Pool Heater Part:Replace the damaged or rusted bypass valve of the swimming pool heater, Bypass valve kit maintains a constant flow to the heat exchanger by opening to...
- Quality Materials:Manifold bypass valv made of high-quality material, which meets the standard and is durable, Extend pool heater life, reduce maintenance costs, and...
You may be interested

The 77707-0001 Manifold Bypass Valve is the ideal choice for owners of Pentair Mastertemp and Sta-Rite Max-E-Therm Pool and Spa Heaters, specifically models SR200NA, SR333NA, and SR400NA. To install, begin by shutting down your pool heater. Disconnect wiring, screws, and pipe buttons linked to the manifold. Next, remove the manifold base plate carefully, ensuring you don’t damage the bulkheads. Replace the existing bypass valve with the 77707-0001 kit. Securely reattach the manifold base plate and reconnect everything as it was. For any compatibility concerns, don’t hesitate to contact customer support for assistance. Enjoy better efficiency!
Best For: Pentair Mastertemp and Sta-Rite Max-E-Therm pool heater owners looking to improve heating efficiency and performance.
Pros:
- Durable Construction: Made from high-quality materials, extending the life of the pool heater.
- Efficient Heating: Helps maintain constant flow to the heat exchanger, ensuring effective heating.
- Cost-Effective: Reduces maintenance costs by stabilizing the line and minimizing wear on components.
Cons:
- Installation Required: DIY installation may be challenging for those without technical experience.
- Specific Compatibility: Only compatible with specific models, limiting use for other heaters.
- Potential for Misalignment: Careful handling is necessary during installation to avoid damaging bulkheads.
Recommended Products
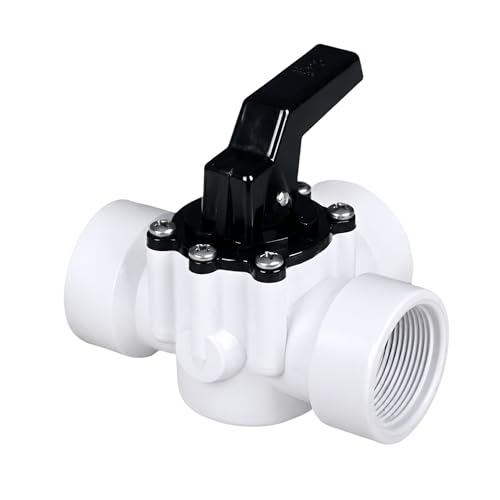
THREE WAY FLOW CONTROL: Direct or shut off water between lines with this 3 way pool ball valve. The 360 degree rotating handle allows smooth adjustment for balanced circulation and efficient system management.

THREE WAY FLOW CONTROL: This 3 way diverter valve pool design lets you direct, split, or shut off water between lines. Ideal as a pool diverter valve 3 port for balanced circulation and system control.

PRECISION FLOW CONTROL: 1 1/2 in. Posi-Close 3 way pool diverter valve 1.5 inch with slip ports. Designed for 1 1/2 in. pipe that glues directly inside each port for secure, leak resistant connections.
Swimables Bypass Valve Kit for Pentair Pool and Spa Heater

Swimables Bypass Valve Kit Compatible with Pentair Mastertemp and Max-E-Therm Pool and Spa Heater...
- Compatibility: Designed to work with 460730, 460732, 460734, 460736, 460805, 460806, SR200NA. SR333NA, SR400NA. SR400HD
- Assembly (Step 1): Turn off system and all electrical power from the breaker. Remove Drain Plug under the Inlet/Outlet Manifold to drain the heater. Loosen the...
- Assembly (Step 2): Remove the Inlet/Outlet Manifold by removing the 10bolts holding the Manifold to the tube sheet. Carefully pry the bottom plate off of the Manifold...
Looking to enhance the efficiency of your Pentair Mastertemp or Max-E-Therm pool heaters? Start by turning off the power at the breaker, then drain the heater by removing the Drain Plug under the Inlet/Outlet Manifold. Next, loosen the inlet/outlet piping unions and unscrew the Thermal Regulator Plug to remove the Thermal Regulator with its spring. Unscrew the 10 bolts from the Inlet/Outlet Manifold, then separate it carefully. Remove the baffle plate to access the bypass valve chamber, replace the old valve with the Swimables bypass valve assembly, and reassemble by reversing these steps for ideal functionality.
Best For: Pool owners looking to improve the efficiency and performance of their Pentair Mastertemp or Max-E-Therm heaters.
Pros:
- Easy installation process for those familiar with heater maintenance.
- Enhances heater efficiency, potentially lowering energy costs.
- Compatible with multiple Pentair heater models, providing versatile options.
Cons:
- Requires some technical knowledge and tools for proper installation.
- May not be suitable for inexperienced DIYers or those uncomfortable with electrical systems.
- Limited to specific Pentair models, limiting its use for those with different heater brands.
Recommended Products
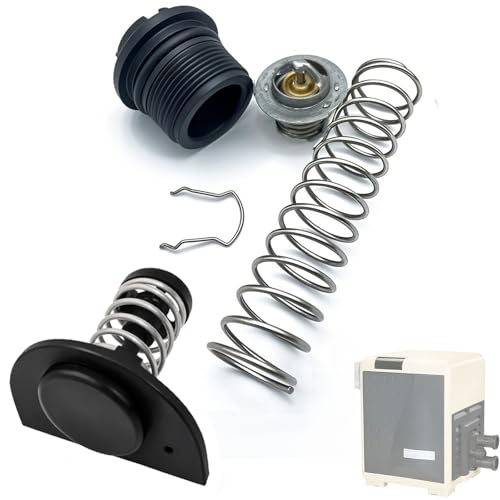
Precise Temperature Control: This 77707-0010 38000-0007S thermal regulator and 77707-0001 Manifold Bypass Valve Kit rated to open at 120°F, ensuring your swimming pool maintains an ideal water temperature for enhanced comfort

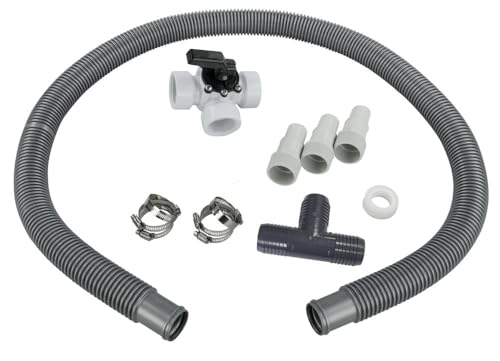
Manual diverter valve replacement kit
Comprised of a length of PEX tubing and crimp rings as well as a fitting for either side, the USA made hot water bypass system is easy to use and install.
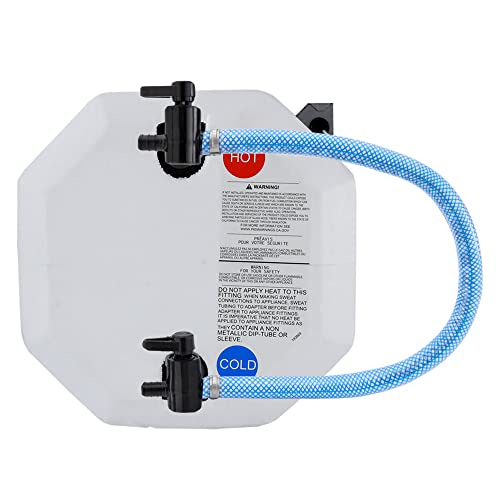
Sun2Solar XD1 Multiple Heater Bypass Kit for Swimming Pools
Sun2Solar XD1 Multiple Heater Bypass Kit | Makes Solar Heating More Efficient | for Above Ground or...
- Compatible with SolarPro Heaters: Specifically designed to work seamlessly with SolarPro Pool Heaters for reliable, cost-effective heating
- Enhanced Heating Efficiency: The Sun2Solar XD1 Multiple Heater Bypass Kit allows you to connect multiple solar pool heaters, maximizing solar heating power for larger...
- Ideal for Larger Pools: Connect multiple heaters in series to efficiently heat larger pools, making it perfect for in-ground installations
Enhance your pool’s heating efficiency with the Sun2Solar XD1 Multiple Heater Bypass Kit, ideal for both above ground and in-ground swimming pools. First, verify you have a compatible pump, preferably 1 HP or higher. Prepare your installation area by gathering the included components: a 3-way ball valve, 72” flexible hose, backwash fittings, hose clamps, and Teflon tape. Connect the 3-way ball valve to your pump and the solar heaters in series, allowing for maximum heat distribution. Once connected, secure all hose clamps tightly to prevent leaks. Regularly check for peak performance during the heating season. Enjoy your warmer pool!
Best For: Those seeking an efficient solar heating solution for larger above ground or in-ground swimming pools.
Pros:
- Maximizes heating power by allowing the connection of multiple solar heaters.
- Compatible with existing pumps, streamlining installation for users with standard pool setups.
- Simplifies setup with included installation components and clear guidelines.
Cons:
- Requires a pump of 1 HP or higher for optimal performance, which may not be available for all pools.
- Installation may require some technical knowledge, potentially complicating the process for inexperienced users.
- Initial cost investment for the kit and necessary pump equipment may be a consideration for budget-conscious buyers.
Recommended Products

【Reliable Material】: The bypass kit is made of durable plastic that withstands the heat from the solar heater and the chemical conditions of the pool water, promising a long service life

PROVEN RELIABILITY. Have a leaking solar pool heater that needs repair? No contractors are required with this easy-to-use repair kit. Using a simple fix that can be done in minutes, you'll be back enjoying your warm solar-heated pool before you know it.

PROVEN RELIABILITY. This CPVC pipe adapter connects your solar pool heating panels to the supply and return PVC plumbing lines. It's extremely durable and provides a leak-free seal from PVC pipe to the panels via a rubber hose connector (sold separately).
Swimables Manifold Kit for Pentair Pool Heaters
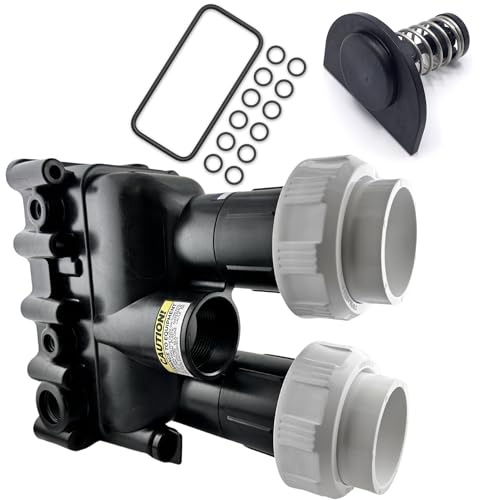
Swimables Manifold Kit Compatible with Pentair Mastertemp & MaxeTherm Manifold 77707-0206 | Includes...
- Compatibility: This manifold kit works with the Pentair Mastertemp Heater, Pentair Mastertemp 400, Pentair Mastertemp 250, and Pentair Mastertemp 300. It will not work...
- Bonus Products: This kit comes with the heater unions PKG188Z, the Mastertemp bypass valve 77707-0001, the manifold oring kit 77707-0120 and the manifold drain plug...
- Durability: This Pentair heater kit replacement is built with high quality, heavy duty materials to ensure a long product life. Made to keep your spa heater working for a...
If you own a Pentair Mastertemp or MaxeTherm pool heater, the Swimables Manifold Kit is your go-to solution for effective performance. This kit includes heater unions, a Mastertemp bypass valve, a manifold O-ring kit, and a manifold drain plug. Start by checking compatibility with models 400, 250, and 300; it won’t fit the Mastertemp 125. Use heavy-duty plastic components to filter debris efficiently, minimizing clogs. For installation, locate designated ports for easy sensor placement. Make certain all connections are tight to protect your pump and filter system. Regularly inspect for wear to maintain optimum water flow and heater efficiency.
Best For: Pool owners with Pentair Mastertemp or MaxeTherm heaters seeking efficient maintenance and performance improvement.
Pros:
- High durability due to heavy-duty materials, ensuring a long product life.
- Optimized design promotes efficient water flow, reducing the risk of clogs.
- Easy installation with designated ports for sensors, facilitating straightforward maintenance.
Cons:
- Limited compatibility as it does not work with Pentair Mastertemp 125 models.
- Requires regular inspection to maintain optimal performance, which may be inconvenient for some users.
- Potential for installation errors if connections are not properly tightened, risking damage to the pump and filter system.
Recommended Products
Precise Temperature Control — This thermal regulator and manifold bypass valve kit helps maintain stable pool water temperature by opening at the appropriate range, ensuring efficient heating performance for your pool or spa heater.

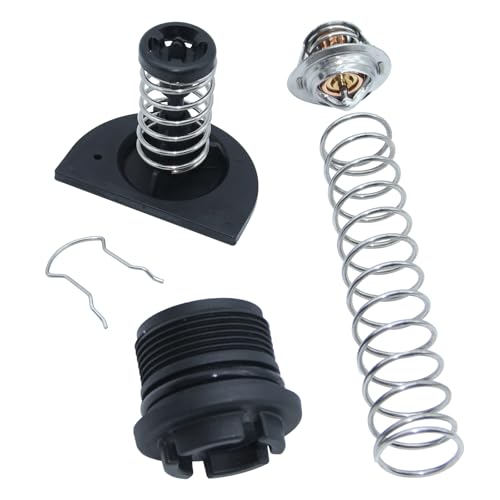
Fd heater bypass cartridge kit

Complete Repair Kit: Includes 77707-0010 thermal regulator (38000-0007S), 77707-0001 manifold bypass valve, and 77707-0120 manifold O-ring kit. Designed to restore temperature control and sealing performance in pool heater systems.
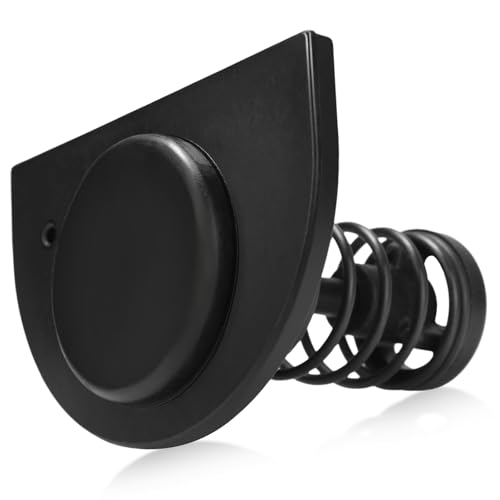
Bypass Kit Compatible with Raypak Pool Heater Models
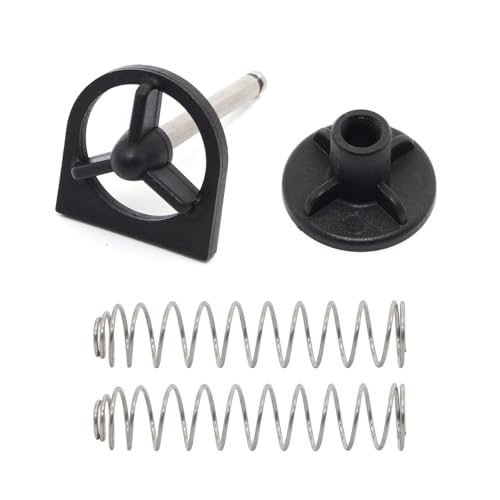
006715F Bypass Kit Compatible with Raypak Heater Models R185A, R265A, R335A, R405A, R206A, R406A...
- Perfect Compatibility: The 006715F bypass kit is designed to work seamlessly with Raypak Capron drain plugs and is compatible with pool heater models R185A, R265A, R335A...
- Replacement Part Numbers: This bypass kit directly replaces part numbers 006715F and 006736F, ensuring easy, hassle-free installation and compatibility.
- Good-Quality Material: Built from good-quality materials, this bypass kit is designed to withstand the demands of pool heating systems.
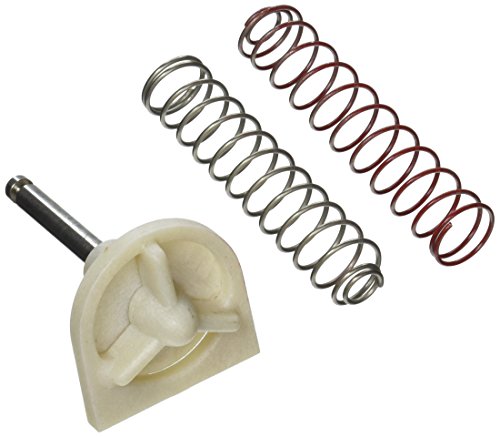
The 006715F Bypass Kit is an essential choice for anyone using Raypak pool heater models, including R185A, R265A, and R335A. To install, first, verify your heater is powered off. Gather the kit components: bypass valve, bypass dam/shaft, and two bypass springs. Remove the existing drain plugs. Next, fit the bypass valve to the heater, aligning it with the Capron plugs for maximum compatibility. Secure the dam/shaft and springs in place. Double-check your connections to prevent leaks. This kit not only controls water temperature precisely but also protects your system from unnecessary wear, enhancing its lifespan.
Best For: Pool owners using Raypak heater models R185A, R265A, R335A, and other compatible models seeking enhanced temperature control and durability.
Pros:
- Easy Installation: The kit is designed for straightforward installation, making it user-friendly for most pool owners.
- Durable Materials: Constructed from high-quality materials, ensuring longevity and resistance to wear.
- Temperature Control: Offers precise control over pool water temperature, improving overall pool efficiency.
Cons:
- Compatibility Limitations: Only compatible with specific Raypak heater models, limiting its use to a narrow range of products.
- Requires Basic Tools: Installation may require basic plumbing tools, which some users may not have on hand.
- Potential for Leaks: Improper installation could lead to leaks, necessitating careful handling and setup.
Recommended Products

Compatibility: Raypak 2" PVC Connector with 2 Nut Heater Flange Kit 006723F.
Bypass Kit Capron

Perfect Compatibility: The 006715F bypass kit is designed to work seamlessly with Raypak Capron drain plugs and is compatible with pool heater models R185A, R265A, R335A, and R405A.
Factors to Consider When Choosing a Pool Heater Bypass Kit
When choosing a pool heater bypass kit, consider several key factors. First, guarantee compatibility with your specific heater models to prevent mismatches. Next, evaluate the quality of materials and installation requirements, then think about performance efficiency and ongoing maintenance needs to keep your system running smoothly.
Compatibility With Heater Models
Before you purchase a pool heater bypass kit, verify you check its compatibility with your heater model. Look for specific model numbers or series listed on the bypass kit packaging. Cross-reference these details with your heater’s specifications to guarantee a proper match. This step is vital, as using an incompatible bypass kit can cause inefficient heating and increased wear on your system. Take note that some kits work with multiple heater configurations, offering you more options. Don’t forget to consult manufacturer guidelines or contact technical support for accurate compatibility information. With the right bypass kit, you’ll streamline your pool maintenance process, so don’t skip this essential step!
Quality of Materials
Checking compatibility with your heater model is just the starting point. Next, evaluate the quality of materials in your bypass kit. Choose kits made from heavy-duty plastics or metals, as these guarantee durability and extend the lifespan of your valves. Look for materials that meet industry standards; they’ll enhance performance and support efficient water flow. Prioritize corrosion-resistant options to withstand pool chemicals and varying temperatures. This choice minimizes wear on the system. Inspect the kit’s ability to handle pressure changes; a robust design prevents premature failures. This assures both effective temperature regulation and reduces maintenance costs. Follow these steps to confirm your pool heater bypass kit stands up to the demands of your heating system.
Installation Requirements
To guarantee a smooth installation of your pool heater bypass kit, start by turning off all electrical power to the pool system and draining the heater completely. Next, gather specific tools like adjustable wrenches, pipe unions, and manifold bolts. Familiarize yourself with the components needed for disassembling, as they may vary by model. Carefully review the installation instructions; some kits may require removing O-rings and thermal regulators before replacing the bypass valve. When ready to reassemble, follow the reverse order of disassembly to keep everything functional and leak-free. Finally, check the compatibility of the bypass kit with your existing heating system for a seamless installation. This will guarantee peak performance and a hassle-free experience.
Performance Efficiency
Understanding performance efficiency plays a pivotal role in guaranteeing your pool heater bypass kit operates effectively. First, check the flow rate; ideally, you want it to maintain a constant 40 GPM (gallons per minute) to improve heating capability. Next, make sure you’ve installed a high-quality bypass valve that allows excess flow to stabilize the system effectively. This aids in achieving consistent water temperatures. Additionally, consider using durable materials like PVC or corrosion-resistant metal for longevity. Opt for energy-efficient designs to reduce consumption, which lowers heating costs. Finally, remember that an efficient bypass system extends your pool heater’s life; regular checks can prevent costly repairs. Take these steps to maximize your pool heater’s performance and reliability.
Maintenance Considerations
When it comes to choosing a pool heater bypass kit, pay close attention to maintenance considerations. First, select kits made from high-quality materials to minimize wear and tear. Next, schedule periodic inspections every three to six months. These checks can identify leaks or blockages in the bypass valve—crucial for avoiding costly repairs later. Clean or replace valve components according to the manufacturer’s recommendations. This practice extends the lifespan and efficiency of your heating system. Keep detailed records of all maintenance tasks performed, such as valve cleaning, replacement dates, and annual inspections, to track performance and plan future servicing needs. Stay diligent, and you’ll guarantee your pool heater bypass kit works effectively throughout the season.
Frequently Asked Questions
How Do I Install a Pool Heater Bypass Kit?
To install a pool heater bypass kit, gather your tools: adjustable wrench, pliers, and Teflon tape. First, turn off the pool heater. Next, locate the inlet and outlet pipes. Cut the plumbing with a pipe cutter, leaving ample space for the valves—about 3 inches. Attach the bypass valves using Teflon tape for a tight seal. Connect the hoses, ensuring they’re secure, and double-check all connections. Finally, turn on the heater and check for leaks.
Can a Bypass Kit Improve Energy Efficiency?
Yes, a bypass kit can boost energy efficiency in your pool system. Start by installing the kit between the heater and pool lines, ensuring proper placement based on your setup. When the heater isn’t in use, redirect water flow, preventing unnecessary heating. This reduces energy consumption, saving you money on utility bills. Regularly check for leaks, and maintain tight connections. Doing so enhances performance and prolongs the life of your heating system.
What Maintenance Is Required for Bypass Kits?
Maintain your bypass kit like a car engine: regular upkeep keeps it running smoothly. First, inspect the valves weekly for leaks or debris. Tighten any loose fittings with a pair of pliers. Check the O-rings for wear every three months; replace them if they’re brittle or cracked. Clean the filter monthly, using a garden hose for easy debris removal. Every season, test the flow rate; adjust the valve if necessary.
Are There Compatibility Issues With Specific Pool Heaters?
Yes, you’ll encounter compatibility issues with specific pool heaters. First, check the heater model against your bypass kit manual. Measure the inlet and outlet connections; they should match, generally 1.5 or 2 inches in diameter. Next, verify the material compatibility—many kits work with standard PVC, but some heaters may require special fittings. If you find discrepancies, consider consulting a professional or contacting the manufacturer for tailored advice on compatible bypass kits.
How Can I Troubleshoot a Faulty Bypass Kit?
Start by inspecting the bypass kit for visible damage, like cracks or loose connections. Next, turn off the water supply and disconnect the hoses. Check the valves—ensure they’re operating smoothly. Look for clogs in the lines, using a garden hose to flush them out. Reassemble everything tightly, then turn the water back on to test. If issues persist, consider replacing worn components, and consult the manufacturer’s manual for specific troubleshooting steps.