As an Amazon Associate, we earn from qualifying purchases. Some links on this site are affiliate links at no extra cost to you. Our recommendations are based on thorough research and editorial judgment.

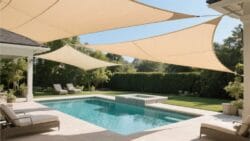
Choosing the Right Shape for Patio Shade Sails
Assess patio size and anchor point locations before selecting sail shape. Choose triangular sails for irregular spaces needing three secure anchors, rectangular or square sails for broad, even coverage. Measure carefully, adding 5–10% fabric for tension, maintain 3-foot height differences for drainage. Use stainless steel turnbuckles and Muscle x3 kits for precise tension control. Position poles to create a slope, prevent pooling, and inspect hardware regularly. Follow these steps for durable, effective shade, and explore further guidance to optimize installation and design.
Key Takeaways
- Triangular shade sails suit limited or irregular spaces, requiring three sturdy anchor points and precise tension with turnbuckles.
- Rectangular or square sails efficiently cover broad patios, needing strong fixing points and slope planning to avoid water pooling.
- Hypar sails need three or four attachment points with opposite corners higher for drainage and even tension distribution.
- Measure outdoor areas accurately, adding extra fabric and anchor space for secure installation and proper angles for runoff.
- Combine shape types creatively considering sunlight angles, wind resistance, and recommended drainage slopes for optimal shading and aesthetics.
Understanding the Benefits of Triangular Shade Sails
You may be interested

Flexibility defines the advantage of triangular shade sails, making them an excellent choice for patios with limited space or unconventional shapes. Begin by identifying three secure anchor points, confirming each can support tension without damage. Use stainless steel turnbuckles to adjust tension precisely, preventing sagging common in triangular shade structures. Measure the distance between anchors carefully, allowing 5-10% extra fabric for proper tensioning and wind load. When coverage exceeds a single sail, overlap multiple triangular shades by at least 12 inches to maintain continuous shade without gaps. Position the sails considering sun angles and prevailing winds to optimize protection and durability. Check all fixings with a torque wrench, tightening bolts to manufacturer specifications, and inspect periodically for wear. Following these steps guarantees effective, adaptable shade structures tailored to complex patio layouts. Additionally, selecting fabrics with high-density polyethylene (HDPE) ensures optimal UV protection and durability for long-term outdoor use.
Recommended Products

【About Installation】Please refer to the diagrams before purchasing. To ensure you buy the correct shade sail, you need to leave 0.5-1 ft of space for accessories to avoid buying an oversized shade

High-Quality Construction: Made with 185 gsm high-density polyethylene (HDPE) shade fabric; features well-stitched seams and sturdy stainless steel D-rings in each corner for lasting durability

【About Installation】Please refer to the diagrams before purchasing. To ensure you buy the correct shade sail, you need to leave 0.5-1 ft of space for accessories to avoid buying an oversized shade. In addition, due to the characteristics of this fabric, there may be a tolerance of ±4 inch from the outer edge of one D-ring to the outer edge of the other D-ring
Advantages of Rectangular and Square Shade Sails
Begin by evaluating the patio or outdoor area’s dimensions accurately, noting length and width to select rectangular or square shade sails that cover broad spaces efficiently. Measure precisely and consider height differences to avoid rainwater pooling. Choose rectangular shade sails for their extensive coverage, ideal for patios, decks, and gardens requiring uniform shade across larger surfaces. Utilize customizable sizes to tailor the sail dimensions to specific area measurements, maximizing protection where it matters most. Identify strong fixing points such as sturdy posts or walls before installation; these guarantee stability and durability under varying weather conditions. Secure anchors with heavy-duty hardware, and tension the sail evenly to prevent sagging. Follow these steps carefully to install rectangular or square shade sails that create comfortable, shaded outdoor environments while maintaining structural integrity. Additionally, considering lightweight designs similar to those in portable pool vacuums can improve ease of installation and handling.
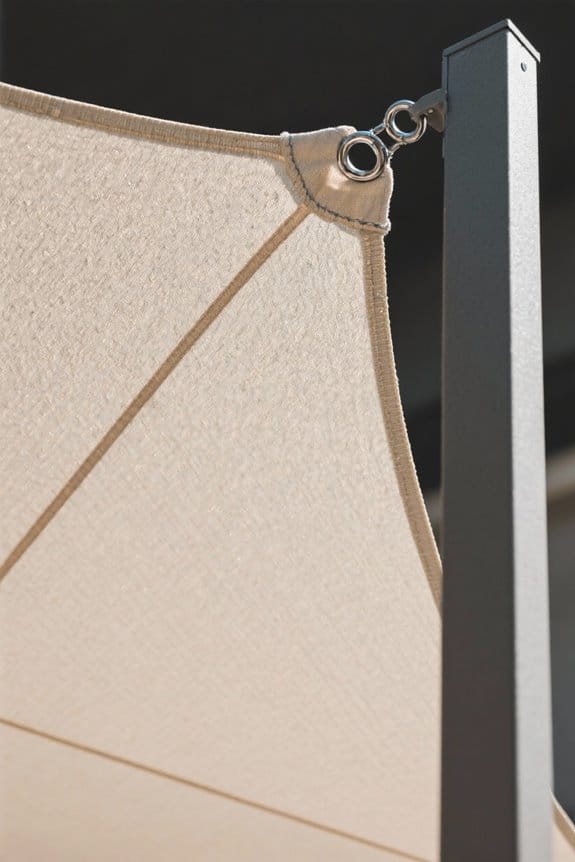
Exploring the Hypar Shade Sail Design

Three or four attachment points define a typical hypar shade sail, creating uniform tension critical for stability. Install robust mounting hardware like stainless steel pad eyes or turnbuckles, guaranteeing anchors align to maintain the hypar’s signature geometric tension. Position opposite corners higher than others to form a sloped surface for effective rainwater drainage, preventing pooling. Use a tensioning tool to tighten the sail shades, adjusting each corner incrementally to evenly distribute stress and avoid sagging. Layer multiple hypar shade sails cautiously, overlapping edges without restricting airflow, to expand coverage and enhance visual appeal. Confirm all attachment points resist wind forces by testing tension periodically, particularly in areas with strong gusts. Inspect fabric for stretch or wear; replace worn components promptly to maintain structural integrity and guarantee continuous performance. For optimal durability and sun safety, select sails made from high-quality 260 GSM HDPE fabric designed to block at least 95% of harmful UV rays.
How to Measure Your Outdoor Space for Shade Sails
Accurately measure the entire outdoor area planned for the shade sail installation, including all ground dimensions needed for coverage. Use a tape measure to record length and width, then add 2 to 6 feet to each side for anchor points. Guarantee a minimum of 1 foot, preferably 3 feet, between the shade sail edges and fixing points to achieve proper tension. Check for obstructions like trees or walls that might interfere with anchor placement. Mark each anchor spot clearly. Use a laser distance measurer for greater precision in complex spaces. Document all measurements systematically, accounting for corners and irregular shapes. Follow these steps carefully to create an effective framework for your shade sail, enabling efficient installation and long-term stability without guesswork. Maintaining accurate measurements and consistent environmental conditions helps ensure the durability and proper tension of the shade sail over time.
Recommended Products

DUAL-SIDED (80 INCH / 2 METER) RETRACTABLE TAPE MEASURE - Retractable, soft, and flexible. Vinyl-coated fiberglass tape is durable and sturdy with a high quality metal end piece. Fits well in a tool belt, as a pocket tape measure, or in your purse.

This product has an exceptionally thick, aggressive adhesive coated to UV stabilized film which resists breakdown and fading.

5-foot soft vinyl tape measure perfect tailor's tool for measuring flat or rounded surfaces
Assessing Sunlight and Environmental Factors
When planning shade sail placement, observe the sun’s angle and direction at various times, using a compass and inclinometer to record precise measurements. Track these measurements morning, noon, and afternoon, noting seasonal variations to predict year-round sun exposure. Identify areas with the most intense sunlight to determine shade sail size and coverage requirements. Analyze local wind patterns to guarantee sail stability, and examine surrounding structures like walls or fences that may cast shade or obstruct airflow. Factor in local weather trends, particularly rain frequency, when designing the sail’s slope to prevent water accumulation. Adjust the angle to enable efficient drainage, preserving the sail’s durability. By meticulously evaluating these sunlight and environmental factors, one guarantees peak shade sail performance, balancing protection and structural integrity throughout changing conditions. Additionally, maintaining proper cyanuric acid levels in pool water nearby can help reduce chlorine loss caused by sunlight, contributing to overall outdoor comfort and pool water quality.
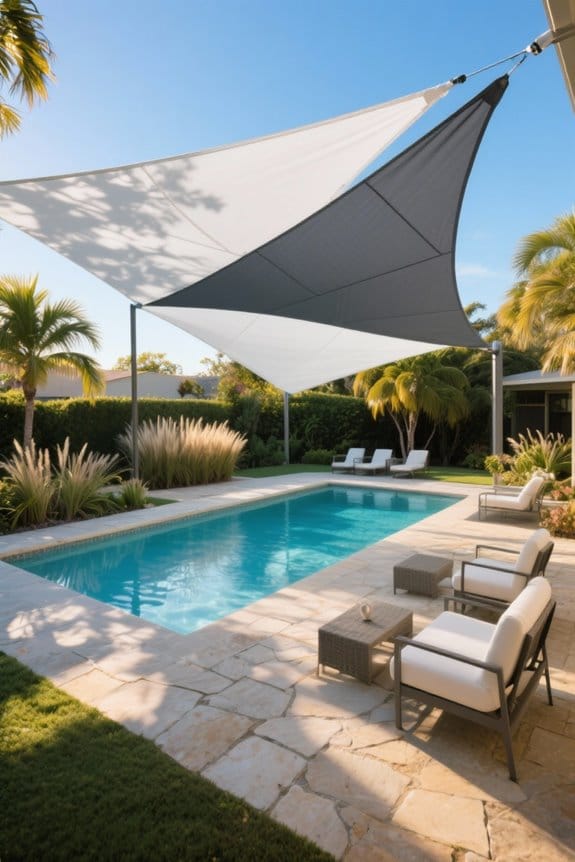
Creative Layouts Using Mixed Shade Sail Shapes
How can mixed shade sail shapes optimize coverage and aesthetics on irregular patios? Combine triangular and rectangular sails strategically, layer them to track sun movement, and maximize shade. Assess sunlight angles with a compass or sun path app before installation and map out overlap zones of approximately 2–3 feet to guarantee continuous coverage. Use mixed shade sails to enhance wind resistance by anchoring each sail with stainless steel hardware rated for at least 300 lbs tension. Overlap triangular sails deliberately to create distinct shadow patterns, achieving a unique aesthetic while maintaining functional shade. Employ tensioning devices like turnbuckles for precise adjustments, correcting sag or flutter. Remember to take into account wind direction changes seasonally, reposition anchors if necessary, to retain stability and optimize the creative layout for both protection and visual impact. Ensuring installation follows the recommended 30° slope drainage guideline is essential for long-lasting durability and water runoff management.
Matching Shade Sail Colors With Your Patio Design
Begin by analyzing the existing patio elements, such as furniture colors, plant varieties, and building materials, to determine a complementary shade sail palette. Prioritize a color choice that complements these features, guaranteeing a cohesive design theme. Select vibrant shades like yellows or reds to energize the space, or calming blues and greens to promote relaxation, while considering environmental themes. Evaluate darker sails, such as navy or black, for maximum UV protection, blocking over 98% of harmful rays, especially in intense sunlight. Consider lighter options like white or sand to allow filtered light, enhancing openness without sacrificing necessary shade. Ascertain the chosen shade sail color complements the patio’s visual appeal and functional needs, balancing aesthetics with UV protection to optimize comfort and style efficiently. Additionally, choosing materials with strong UV resistance ensures the shade sail maintains its color and effectiveness over time.
Selecting the Right Anchoring and Mounting Systems
Make certain that the selected shade sail color complements not only the patio design but also the anchoring and mounting requirements. Identify sturdy fixing points on solid surfaces or secure poles, then measure to ascertain the anchoring systems extend 2 to 6 feet beyond each sail corner. Use Muscle x3 kits for effective tensioning, allowing 1 to 3 feet of adjustment without extra accessories. Install turnbuckles at each fixing point for fine tension control. Account for pole inclination angles, noting that tie rods angled near 75° do not require additional dimension adjustments. Verify total coverage surpasses the sail area by at least two feet to facilitate secure mounting. Follow these steps precisely to guarantee a durable, well-tensioned installation that maintains the shade sail’s shape and function over time. For optimal durability, ensure the use of reinforced edges and stainless-steel or aluminum grommets as recommended for long-lasting outdoor tensioning systems.
Recommended Products
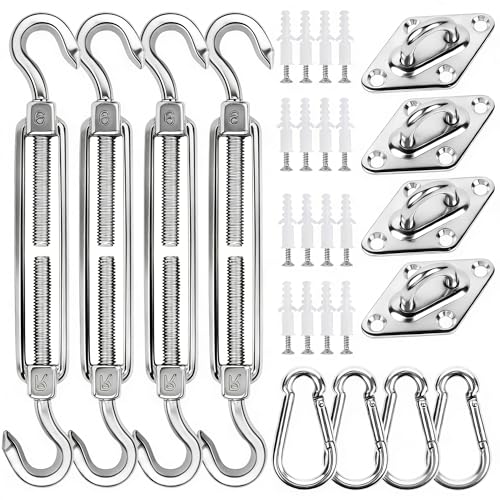
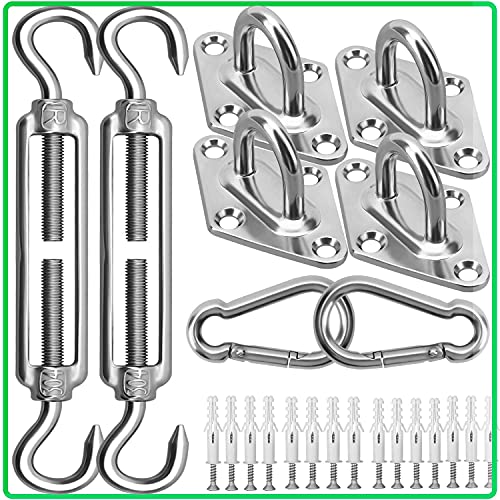
All-in-One Sun Shade Sail Hardware Kit: Our complete shade sail hardware kit includes everything you need for easy installation: 4 turnbuckles, 4 snap hooks, 4 pad eyes, 16 screws, and 16 expansion anchors. Ideal for sun shades outdoor patio, pergolas, awnings for patio, and outdoor sails for shade waterproof.

Ultimate All-Weather Durability: Experience unmatched reliability with BUDONI's Shade Sail Hardware Kit, designed exclusively for outdoor use in every season. Crafted from premium 304 stainless steel, resistant to rust and corrosion. It's engineered to endure high winds and harsh conditions, making it a steadfast companion for your patio deck shade sail. Enjoy the safety and durability of BUDONI's Shade Sail Hardware Kit, ideal for any outdoor area and a top choice for reliable shade solutions.

Premium Craftsmanship Durable: BUDONI shade sail hardware kit is crafted from premium 304 stainless steel with an anti-rust black oxide finish, providing excellent corrosion resistance and long-lasting durability for extended outdoor use. This sun shade hardware kit withstands rain, UV solar exposure, and strong wind, making it an ideal choice for securing shade sail. This shade sail hardware delivers reliable performance while adding a modern, high-end look to sun shades outdoor patio setups.
Tips for Ensuring Proper Tension and Drainage
Although proper tension is critical for shade sail durability, achieving effective drainage prevents water accumulation that may cause sagging or damage. Maintain a minimum height difference of 3 feet between mounting poles and the shaded area to guarantee proper drainage. Install turnbuckles to enable precise tensioning, keeping the sail taut and stable under varying weather conditions. Angle poles deliberately, creating a slope directing water runoff toward designated drainage zones like gardens. This slope enhances drainage while maximizing shade efficiency. After installation, perform regular tensioning checks to detect any slack or stretching, adjusting turnbuckles as needed to restore ideal tension. Neglecting these steps risks water pooling, which compromises structural integrity and reduces sail lifespan. Apply these techniques systematically to maintain both tension and drainage, guaranteeing your shade sail remains functional and visually appealing. Always follow strict safety protocols during installation and maintenance to ensure personal safety and material longevity.
Recommended Products
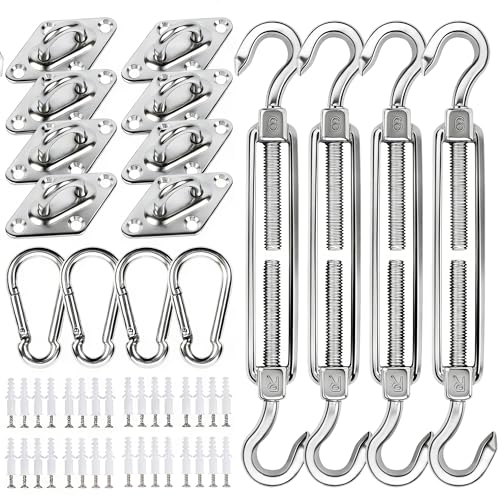
[One Kit for Any Design]: Conquer any shade sail project—rectangle, triangle, hexagon, or custom shapes—with one comprehensive 80-piece kit. Ditch the confusion of piecing together multiple sets. Plus, when installing common square or triangle sails, the extra hardware acts as your instant backup plan, saving you time and hassle if a replacement is ever needed.

Heavy Duty & Premium 304 Stainless Steel: Our shade sail hardware kit is crafted from high-quality 304 marine-grade stainless steel, delivering exceptional strength, durability, and corrosion resistance. Every component—from turnbuckles to wire ropes—is built to withstand harsh outdoor conditions, ensuring long-lasting, rustproof performance. The sleek silver finish is neutral and versatile, blending seamlessly with any patio, garden, or outdoor decor.

All-in-One Sun Shade Sail Hardware Kit: Our complete sunshade hanging kit includes everything you need for easy installation: 4 turnbuckles, 4 snap hooks, 4 pad eyes, 16 screws, and 16 expansion anchors. Ideal for sun shades outdoor patio, pergolas, awnings for patio, and outdoor sails for shade waterproof.
Practical Considerations for DIY Shade Sail Installation
How can precise measurements and proper hardware selection streamline a DIY shade sail installation? Begin by measuring the area, allowing at least 2 feet beyond the sail’s dimensions to position anchor points securely. Choose stainless steel turnbuckles to achieve ideal tension, preventing sagging over time. Position anchor points considering pole inclinations to maintain correct sail angles for rainwater runoff. Consult step-by-step guides or instructional videos before starting to grasp the correct sequence and avoid errors. Attach shade sails firmly to anchors, adjust tension gradually using turnbuckles, and verify tautness evenly across corners. After installation, inspect tension regularly, tightening hardware as needed, and check for material wear. Follow these practical steps carefully to guarantee a stable, functional installation that withstands weather and maintains effective shade coverage. Additionally, selecting high-density polyethylene (HDPE) materials for the sail can enhance durability and improve UV protection, ensuring long-term outdoor comfort.
Recommended Products

Material: Stainless steel. Weight: 2.07ounce/1PCS
High Quality Shade Hardware Kit - This 6" rectangle outdoor shade sail installation kit is made of high quality 304 grade stainless steel. The hardware kit is extremely strong and resistant to the elements, This is can to support 141s of pounds. High load-carrying capacity to keep your sails stable in wind, suitable for windy areas or large fixtures such as sun shade sail, canopy

All‑in‑One Shade Sail Hardware Kit: Includes 2 silver turnbuckles, 2 snap hooks, 2 pad eyes, 10 screws, and 10 expansion anchors – everything you need in one box, no extra trips to the store. Suitable for smaller shade sails, patio canopies, pergolas, awnings, and garden shades.
Frequently Asked Questions
What Shape of Shade Sail Is Best?
The best shape depends on space and purpose. Triangular sails offer flexible installation with shade sail benefits in tight areas, while rectangular ones provide extensive coverage. Installation tips emphasize tension and attachment points for durability and ideal shading.
What Is the Best Sail Shape?
The best sail shape depends on patio size and sun exposure. Durable sail material guarantees longevity, while installation tips emphasize secure anchoring and precise tensioning to prevent sagging, optimizing shade effectiveness and stability during various weather conditions.
How to Arrange Shade Sails?
Strategic shade sail placement supports stylish setups. Overlapping sails and sloping surfaces guarantee effective water drainage. Installation tips include maintaining tensioning distance and analyzing sun and wind exposure, creating a comfortable, covered corner with careful configuration and consideration.
What Is the Difference Between Square and Triangle Shade Sails?
Square shade sails provide broader coverage, ideal for larger areas, while triangular sails offer installation flexibility and creative designs. Shade sail benefits include varied aesthetics; installation tips emphasize secure fixing and tension to minimize sagging.